The Quick Alert Wizard is designed for sending out messages when you do not have the time to create them one at a time. This is best used in timely emergencies when you do not have the messages you want to send already saved in Swift911.
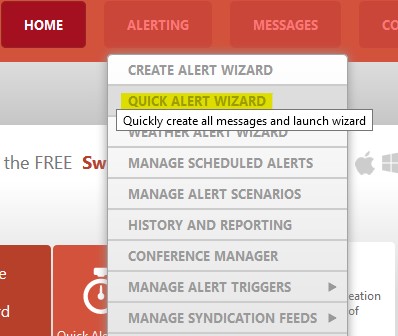
Step 1: Hover Over “Alerting” and click “Quick Alert Wizard.”

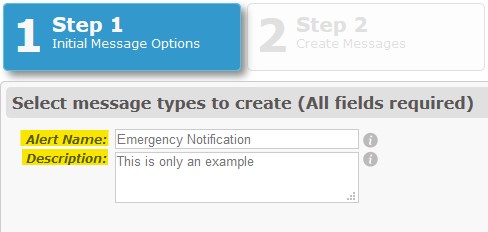
Step 2: Type in an Alert Name and Description.

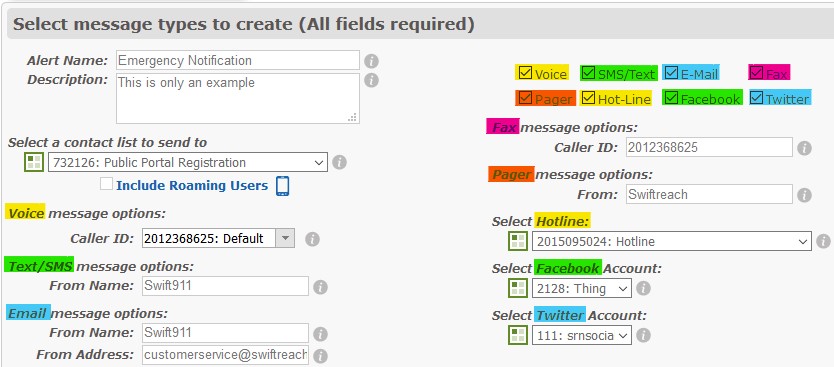
Step 3: Check off each box for the message type you wish to send
For every box you check off, another field will appear onscreen. These are usually selections that help the recipient identify where the message is coming from.


Step 4: Apply any necessary changes to the fields that show up from your selections in Step 3.
| Field | Necessary Action |
| Contact List | Choose a Contact List or List Group to send to. |
| Voice | Confirm or change the Caller ID number. |
| SMS/Text | Confirm or change the SMS From Name. |
| Confirm or change the Email From Name and From Address. | |
| Fax | Confirm or change the Fax Caller ID number. |
| Pager | Change the Pager From Name. |
| Hotline | Choose which hotline number to store the voice message into. |
| Choose a Facebook account to post to. | |
| Choose a Twitter account to post to. |
Note: You can make the Hotline number the same as the Caller ID number for voice, so when people call the Caller ID number back after getting the phone call, they will hear the voice message played back to them.
Step 5: Click “Next”
Step 6: Type in your message content in the content box. If your message is set up to be sent through SMS, Facebook, and/or Twitter, and you exceed 140 characters in your content, you will receive a pop-up message. You will be prompted to differentiate between the long message content for Voice,Email,Fax,Hotline, and a shorter message content for SMS,Pager,Facebook,Twitter, that is under 140 characters.
Step 7: Once you have your message(s), click “Next.”
Step 8: Choose when you would like the message to go out, options include:
| Option | Description |
| Run immediately:(Recommended) | Launches the alert immediately (after confirming in step 10 of this guide). |
| Run Once: | Choose a specific date and time to launch the alert. |
| Run Weekly: | You can send this alert on multiple days of the week, every week. |
| Run Monthly: | You can send this alert on a monthly basis. |
Step 9: Click “Next.”
Step 10: Confirm that all of your setting are correct, then click “Launch.”
You’re done! The message(s) that you have created through the Quick Alert Wizard will be available for later use under “Manage Messages.”